

 {{item.label}}
 IPXProxy Proxy User Guide
JasonBen 2024-08-16 16:53
Step 1: Click on the “Package Purchase” page and select a package according to your needs.

Step 2: Extract Residential Proxy
Get proxy: Click on “Get Proxy” at ① below.
Country/Region: Select “Corresponding country” in ② below.
–Scenario 1: The business does not need precise positioning, just the country, select “country”
–Scenario 2: The business needs precise positioning. After selecting countries, select “continent/city” for positioning
Access Point: After selecting the country in ③ below, the “Access Point (proxy server)” will be automatically assigned.
IP duration: As shown in ④ below, it means the maximum usage time of the IP, and the IP will be changed automatically when the time is up, and the change of IP will not cause network interruption or affect the usage.
Number of proxies: As shown in ⑤ below, it means the number of proxy IP addresses, fill in the number of exported IP addresses according to the business requirements, and the maximum number of exported IP addresses should not be more than 1,000.
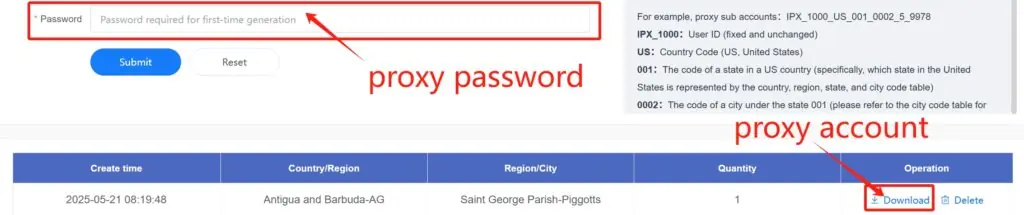
Proxy password: As shown in ⑥ below, when generating proxy IP for the first time, you need to set the proxy password first, which also refers to the password for generating proxy IP address. The change of the password takes effect for a short time.
Generate proxy: As shown in ⑦ below, when you complete the above 6 steps, click “Submit”, which will generate a txt document, download the document content is generated according to your choice of proxy

Step 3: Get proxy server, port, proxy IP account and password
IPXProxy is strictly based on the Socks5/Http proxy protocol, and the pattern of Socks5/Http proxy accounts is as follows
Proxy Server(IP/Domain):Port:Proxy Account:Password
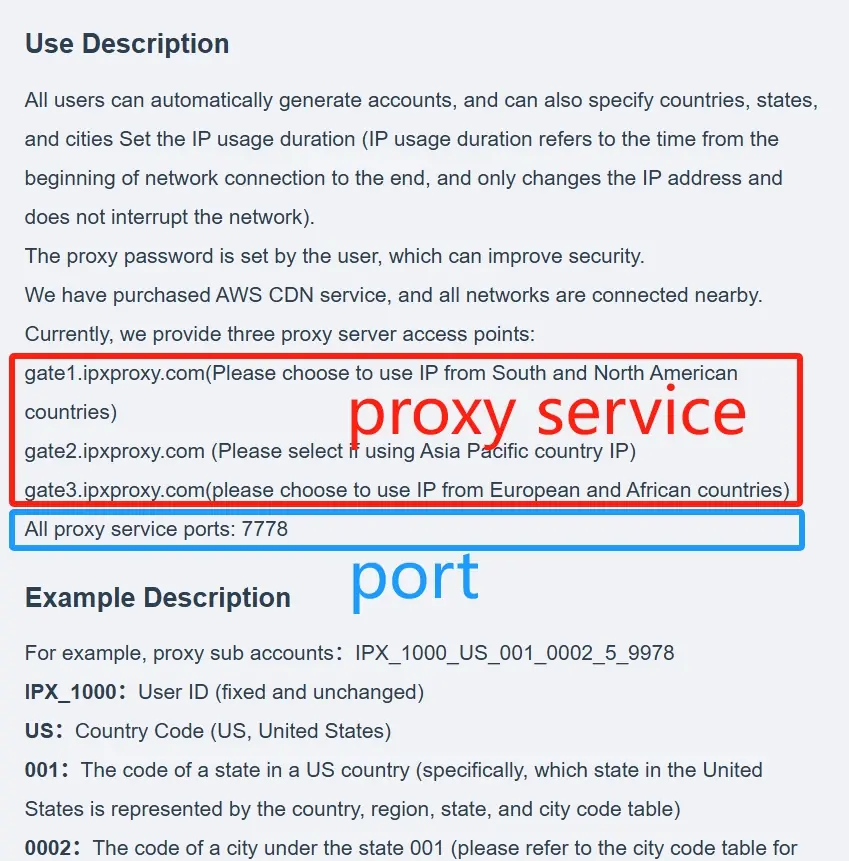
Proxy server (recommended to use the proxy server automatically assigned by IPXProxy, the delay will be lower)
gate1.ipxproxy.com(please choose to use IP from South and North American countries)
gate2.ipxproxy.com (please select if using Asia Pacific country IP)
gate3.ipxproxy.com(please choose to use IP from European and African countries)
Port: 7778
Proxy account: open the downloaded txt document, the content displayed is the proxy IP account
Password: set the proxy password
Step 4: What each element of the exported proxy represents
Example:
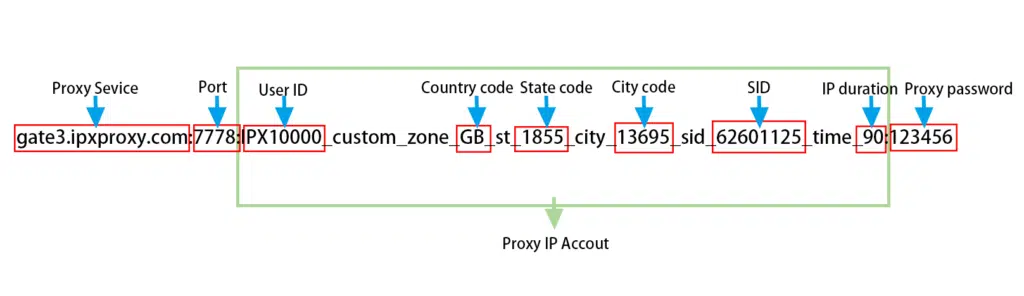
gate3.ipxproxy.com:7778:IPX10000_custom_zone_GB_st_1855_city_13695_sid_62601125_time_90:123456
Proxy server: gate3.ipxproxy.com
Proxy server port: 7778
User ID: IPX10000
Country code: GB
State code: 1855
City code: 13695
SID: 62601125
IP duration: 90 (unit: minutes)
Proxy password: 123456
Proxy protocol: support Socks5/Http(s), no need to modify the port
For a more intuitive introduction, please see the graphic analysis:
Step 5: Verify if this IP is valid
Type【cmd】in the search box at the bottom of your computer and enter 【command prompt】to test the connectivity of the extracted IP:type curl -x + generated proxy information + ipinfo.io, such as curl -x IPX10000_custom_zone_GB_st_1855_city_13695_sid_ 62601125_time_90:[email protected]:7778 ipinfo.io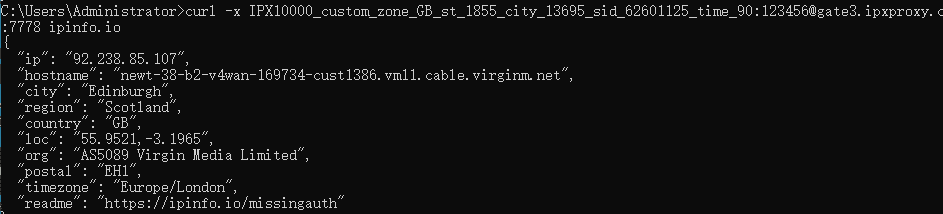
After typing enter, if you can view the proxy IP information, it means that the IP is connectable, we have successfully obtained a proxy from the United Kingdom by executing the curl command.
United Kingdom (country code: GB), Scotland (state code: 1855), Hamilton (city code: 13695).
How to configure and use the proxy
After the proxy is extracted, you can configure it in your browser or other platform tools, the specific configuration method varies depending on the platform or software, but usually you just need to fill in the IP information in the” Network Settings” and “Proxy Settings” options of the relevant software to the corresponding location. If you encounter any problems in use, please feel free to contact our customer service for help.
Grow your business
70 million residential IPs in 230+ countries/regions around the world
 Buy Now
 Contact Sales
Global Pure IP Proxy Service Millions of enterprise-level dynamic and static IPs, empowering diverse online businesses.
Proxies
Learn
Legal
Contact Us


Copyright © 2024.IPXPROXY All rights reserved.